Showing posts with label DIY. Show all posts

Tuesday, March 26, 2013

Bronze and Gold Super Ornate Media Console Transformation

This vintage dresser was an awesome find from a local thrift store. My trusty sidekick, Robin, discovered it. She sent me a photo and I said "YES! Will they hold it until I can get there tomorrow?" She generously bought it, help them load it in her van AND delivered it to me! What a gem! (Her and the console!) This piece didn't sit in my shop too long, until someone wanted it and was open to my suggestion on how to transform it. Note, I completely modified the hardware finish too!
bronze and gold console, media console, gilded furniture, hollywood regency
 
This is what it looked like before, minus the gold faux satin fabric curtain behind the mesh wire on the center doors. It looked like someone had sprayed stain along the top and bottom edges in an attempt to darken the finish. Did I mention they did a lousy job?
 
 
See how dull the hardware was? Yuck! I typically just tweek the hardware finish but this hardware screamed for a facelift.
I knew the piece was going to be bronzey with gold accents. The piece was sanded and thoroughly cleaned. I started with a metallic copper/bronze primer base. This alone greatly improved the piece.
You can see on this door where the hardware was that the piece was originally more golden amber in tone.

 
The doors of course were primed the same way as the base. Since they were being COVERED in gold leaf, I applied the adhesive size directly to the bronze primer. If you would like a more detailed explanation on how to gold leaf, my blog sponsor, The Gilded Planet has some awesome video tutorials on gilding. 
Does it make me weird that I get so excited at how awesome gold or silver leafing looks on really ornate objects? It's an awesome way to transform outdated picture frames and mirrors. I will be hosting a basic gilding kit giveaway starting Sunday night. Be sure to check back so you can enter. Or even better, click that " Get my blog posts sent to your inbox" button on the right so you don't miss out!
Somewhere along the way (which I did not photograph), I top coated the primer coat with a bronze metallic paint. I used Charred Brown Brass from Blue Pearl. Their metallic paint has so much shimmer so that when you glaze over it you achieve a really rich, warm glow.
So here's the piece with the metallic base with the gold foil accents. It would look awesome in Las Vegas! Not so much in the average persons home. That's where the glaze comes in to play.
I used a raw umber oil glaze to tone it all down. You can see the difference in glazed and unglazed. The left picture of the doors show the glazed door on the left. The picture on the right shows everything glazed, except for the top drawer. What an amazing difference!
 
glazed gold leaf, before and after 
 
I let the glaze dry for several days, then coated the entire piece with an oil varnish. It really turned out cool. I truly apologize for my photography skills (or lack of). I am working on it. I think you get the idea. This piece was a beast so shuffling it in and out to try and get better lighting was a challenge.
bronze and gold furniture, gold leafed furniture
 
So don't forget for all the gold leafing junkies out there, I will be giving away a basic gilding kit in the next week. Sign up by email so you don't miss the post. What piece would you transform with a gilding kit for gold leafing?


Pin It
Fluster Buster
Follow my blog with Bloglovin

Monday, February 25, 2013

10 DIY Paint Tips Your Home Improvement Store Won't Tell You

copper ceiling
Copper faux finished ceiling with painted walls
I have been painting professionally for 18 years. Mostly murals, furniture and decorative, faux finish stuff. But my clients often prefer to have a female painting in their home instead of a big, burly guy who may or may not speak English. With decorative painting you must tape off because you are often using a rag or a trowel to complete the finish. Most finishes require some sort of base to begin the process so I am quite proficient at regular painting. I am sure there are many tips and tricks for painting out there, but these are a few things that I've learned along the way that continue to cut costs and simplify each day.
    DIY Paint tips
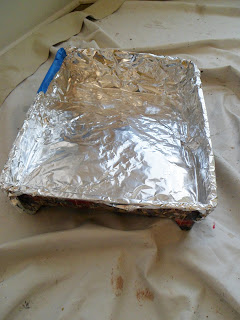
1. Foil for cleanup: I know you can by plastic paint tray liners, but when you paint regularly, it really cuts into the budget. I started buying a separate roll of heavy duty aluminum foil. We pull off a piece to fit into the tray. Saves us from cleaning the tray and it gives a fresh pan to roll in every time.  And if the aliens land, we can always put it on our head so they can't read our thoughts. 
2. Paint additive for quick clean up: I'm sure you've heard of Flotrol. Each paint company labels their own as well. It's typically a latex paint additive. I add about a quarter size into the base of my paint brushes. It keeps the paint wet in the brush and makes clean up a breeze. If you don't do this and some paint hardens in the bristles, I covered how to clean them in my Pinterest projects that I actually completed post.
DIY paint tips

3. Grey tinted primer under reds : If you have ever painted a wall red before, you know it can take 5 or 6 coats to get proper coverage. Grey primer is the solution. It makes the red more opaque so that it typically covers in two coats.
4. Primer on walls not required: Good quality paints cover well. If your walls have been painted before they don't need to be primed to change the color. The exception would be if your walls are a dark color and you are going light or if your walls are disgustingly dirty or moldy. One other bit of info, those new "paint and primer in one" paints out there are not for painting furniture unless it's already been painted. You should still prime raw wood and furniture first for durability.
5. Brush cut in then roll: I always recommend that you cut in the edges with a brush first and ideal roll while that is still wet. Perhaps work on one wall at a time or half  a wall. This is most important with eggshell or satin paints.
6. Quality tools: Cheap brushes and rollers create more work and frustration. If you hate painting, it may be your tools. You get what you pay for. Invest in good quality and clean thoroughly after each use. Cheap brushes have bristles that splay everywhere. Cheap rollers leave fuzz and cause paint spatter.
7. Quality tape: Don't use vanilla colored masking tape on walls or trim. It's too sticky and will either leave residue or will pull off paint and wall board when you remove it. Use the blue tape. There are different brands, some better than others.
8. Quality drop clothes: Use heavy canvas or vinyl backed drop clothes. Painters plastic is for covering furniture not floors. You will slip and break your neck if you try to use plastic. It's too lightweight and it's slippery.
9. Wrap brushes in plastic: While waiting for layers to dry, you can wrap your bush in plastic to keep the paint from hardening and creating crusty bristles.
10. Refrigerate rollers: If your painting project will span over more than one day and you hate to clean rollers, you can wrap them tightly in plastic at the end of the day and refrigerate them. The cold keeps the paint from curing and you can reuse it the next day.

I hope you find this info helpful. If you have any questions or comments, I would love to hear them. Do you have a useful painting tip to add?


Pin It

Thursday, January 17, 2013

Silver Plated Platter Transformation DIY Rusted Finish

We inherited some various silver platters a few years ago. Some sterling, some plated. Some of the plated ones weren't in great shape but had some pretty detail on them. I'm not much into silver. I'm a warmer, gold and bronze kind of girl. Or rust. I have this piece that my wonderful Aunt Edey gave me many years ago when brass was all the rage. When that craze passed, I still loved the piece, but wanted to update it.

Since it worked so well on the brass, I thought, "Why can't I do this on the silver-plated pieces?" So here goes. Here is the piece in the condition that we received it.


The first step is to lightly sand the piece to improve bonding, then wipe clean. The second step is to apply an acid blocking primer. It is red and it stops the rust from eating all the way through the iron paint.

The third step is to apply the iron paint. Yes, the paint actually has iron particles in it! I recommenr two coats. The photo shows the first coat.

After this dried overnight, the fun part starts. Fourth step is to splatter with a special solution to rust the paint. It takes several applications to reach varying degrees of rust. You can brush it, sponge it, spray it or spatter it.

This is the piece in process. Note my rusted studio wall in the background. I love this finish! I would love to live in a castle! No bright and airy rooms for me! That's what the outdoors is for.
Once you reach the desired level of rust, you must apply a sealer to stop the rusting process. It goes on milky, but dries clear.


Once the sealer dries, add a coat of acrylic polyurethane to protect the finish. This is the finished piece! Imagine the possibilities!


Do you have any old pieces that need updating? Contact me or comment if you want to know what products to use.


Related Posts Plugin for WordPress, Blogger...