Showing posts with label upcycled furniture. Show all posts

Sunday, February 10, 2013

Weekend Madness - A Glimpse into My Weekend, Furniture, Shoes and More

I always wonder why my weekends don't feel like weekends anymore. When you love what you do, you really don't mind it. Work becomes fun and exciting and it all gels together. Except when fatigue and pain pop in. :)
I did get to have some fun at my husbands company awards party. I did get a new outfit, but didn't want to waste money on heels I might wear once per year. I'm a jeans and t-shirt kinda girl. I apologize that I didn't get a photo of us. We looked really awesome but you'll just have to take my word for it. I did however decide to modify some comfy heels I had. They were black Aerosoles with a wedge heel. Higher than I typically would wear, but they don't hurt my feet. I felt they needed a little bling. Broke out my container of Swarovski crystals and found some larger black diamond ones that I had used on someone's walls. (Yes, I put crystals on walls, why wouldn't I? I'll post about it sometime.)
Just added a touch of bling, but what do you think?


I also had a couple of accent chairs and a table I was trying to finish. And I did complete them. Craziness again. The chairs were matching, but I treated them totally separate. One gloss black and gold the other hot pink with pink leopard print fabric. Very dramatic, but that's the way I roll. Hopefully, someone will fall in love and buy them. Do you think these are too over the top?
hot pink and leopard chair
Hot Pink Chair with Pink Leopard Fabric

black and gold chair
Gloss Black Chair with Black and Gold Fabric
I love the pink leopard chair! If I had a teenage daughter, this would be in her room! If I had a music room, the gloss black chair would be sitting near the piano!
I recognize that my backdrops for my photos need some consistency. I have the hardest time getting good photos in good light, etc. I've been trying to determine the best way to create a large enough back drop for my furniture. I went to the Habitat for Humanity Restore this weekend which has tons of salvaged housewares, furniture, etc. I picked up few closet doors and bifold doors that I am transforming to be a consistent backdrop for me. I'll be working on a post for that as well. I am also looking for a cheap crystal chandelier for staging my photos. For my "flooring", we remembered we had some old matchstick blinds in the attic. I'm going to paint and stencil those to create a soft floor for staging my photos. I'll be posting on that as well.
Back to my furniture. I had a small drop leaf bistro table that I've been trying to decide what to do with it for a long time. This is how it turned out. Let me know if you want me to post about how I did this.
bohemian decoupaged bistro table

Decoupaged Bistro Table
I think the decoupaged bistro table turned out pretty cool. I would love some honest feedback!

I almost forgot! My carrier showed up at 11 pm Saturday night to pick up my latest custom order clock face table. Green, Black and Gold! It's on it's way to New Jersey!
black green and gold clock face table
Black, Green and Gold Clock face Table
Sometimes my days seem endless and I always feel like I didn't accomplish enough, but when I write it all down it definitely makes me realize, many things were achieved and I need to slow down a bit. Have an awesome week!


Pin It

Thursday, July 26, 2012

Hand Painted Console, Chest of Drawers and Upcycled Drawer Faces

This summer has been great for finding awesome furniture pieces to transform into beautiful, unique treasures. I've had some fun wall and ceiling projects (wait til you see my blog next week!), but am really enjoying rejuvinating old furniture. I've had some custom orders as well. It's so exciting when someone wants you to find a special piece for them and put your painted spin on it!
I won't rehash, sanding, priming, painting, glazing and polyurethaning furniture but here are some fun pieces I've recently completed. This chest of drawers is SOLID! Very heavy and sturdy, although to see it now it looks elegant. This finish has the look of raw silk. A hint of shimmer and texture.


This was the chest before I did anything to it. It was a dark cherry finish and on the inside too. I used the slightly red copper tone for the stencil to give a flow when you open the drawers. Here's the piece before.

I also found a more modern, mid century looking piece. It looked like the perfect piece for a huge, flat screen tv. And someone had already cut out two of the interior drawer faces for audio video equipment! Score! Here's this piece before.

I decided since it had a modern flavor, that I would keep a clean finish to it. I almost did it laquer white. Then I decided a nice neutral beige (who am I? I NEVER do nice and neutral). I did add a little pop of soft aqua on the inside (I just had to add some color)! I think it has a coastal feel to it, but also work very nicely in any decor. The hardware I painted gloss black. Would love to hear what you think!

I also had an awesome client give me all of her doors and drawer faces since she was refacing her kitchen cabinets. All solid wood and in good shape. Here's what I did to upcycle a few of the drawer faces.


Found these cool iron hooks and painted the drawers and hooks the same. Added a few hangers to the backs, and now they're beautiful coat or towel hooks! You can find these in my online shop. Thanks for looking!  http://www.etsy.com/shop/savardstudios?section_id=11262369


Monday, June 4, 2012

Red and Cream Clockface Table How To


In my last posting, I gave you a sneak preview for this post. This is my favorite clockface table so far.  I actually had someone from New Zealand contact me about shipping it to New Zealand! Very exciting for me to have someone on the other side of the world want my little ole table!

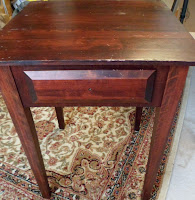
So anyone with a round table can paint it with a clockface. This is what my table looked like before.
Before

The top was pretty worn so it was a perfect candidate for painting. As always, I sanded it just to scuff the surface. Next, I rolled on a good quality latex primer, a slightly creamy tint since I was using antique white for my base coat.

I let that dry overnight and then applied 2 coats of a antique white satin latex. Once that dried, I located the center of the table and stuck in a push pin. I cut a string long enough to reach the inner diameter of the red border. With a pencil secured to the string, I lightly sketched a circle. This was the line that I hand painted the red border to. Hand painting is never perfect, but in the end it's fabulous! I blended two shades of red and applied 2 coats to create my red border. You can also see the picture of the actual clock face that was my inspiration for this table.


After several days of dry time, I printed out my lettering on the computer. I used tracing paper to transfer the letters to the table. I used my hand cut stencil for the roman numerals.
These were also hand painted once the letters were transferred. To add a little something extra and to clean up the painted edge where the cream and red met, I used a gold paint pen and my string to create a thin gold circle. Once everything was dry, I used a hard rubber sanding block with sandpaper to create some random distressing.
I loved this effect on a previous table, but after the fact felt like this table was busy enough that it didn't really need the distressing. Oh well, too late to change it back...still learning after all these years!
I used a raw umber glaze to age all the colors and give it some depth.

The top was finished with an acrylic varnish. I blended equal parts of flat and satin so that it wasn't too flat and not too shiny.
The iron base was previously black but needed some touch up. I sand and scraped and loose paint and spot primed. I spray painted the entire base red and let that dry. Next, with a mineral spirits ladened sponge, I began to spray the base black, wiping edges with the sponge to reveal flashes of red. This was the final effect.


Check out the final piece in my Etsy store. https://www.etsy.com/listing/99902582/breakfast-table-clock-face-hand-painted.  It's also available locally at the Dilworth Blacklion in Booth 409, Eeeklectic Town.
Does anyone have any furniture pieces you are tackling this summer? I'd love to see what you're doing or give you some input if you have a project in mind!

Monday, May 21, 2012

Animal Print Silver and Gold Leafed Side Table

You may remember the small turquoise table I did a little while back http://savardstudios.blogspot.com/2012/04/vintage-turquoise-console-and-side.html. I decided to be a bit crazy with it's mate (although now they don't go together at all!). Such a simple, classic mission style table.
..until I finished with it! Now it's a truly, unique, one of a kind (ooak) side table.

Parts of it are silver leafed, parts are gold leafed. The top was transformed with a zebra print stencil. The legs and drawer were accented with leopard print. The entire table was glazed with a warm brown glaze. Once dry, I polyurethaned the table for durablity, two coats on the top. I used an old cabinet knob and upcycled it by priming, painting, silver leafing, glazing, sealing, then finished it off with black diamond Swarovski cystals. Talk about a blinged out table!! Do you think I'm crazy?! I would love to hear your opinions on my furniture transformations.
Here are the step by step instructions for this table. First I sanded the table and wiped it down. I base coated it with a chocolate brown, furniture grade priming base coat. Color here is not terribly important since I'm covering it with gold and silver leafing. A little color peaks through here and there, but not much. It's classic to do a red base an let a little more color crack through. Here's how the leafing size looks going on. It's milky white but dries clear and sticky.
I did the silver areas first. Once they were leafed, I came back and did the gold areas of the table. After all the leafing was complete, I added the zebra stencil to the top only. 

I used a black glaze for this step because I didn't want it to be solid black. A little more sheer suites my taste better.
Next, I added the leopard stencil to the gold legs and gold drawer face. I think I've mentioned before, I actually hand cut this leopard stencil, many years ago using an exacto knife. I really need to get a new one. There are many places online that will custom make stencils for you. I must do that soon.

Once the stencil design was complete and dry, I glazed the entire table with a warm umber glaze. Love the way this gives the foil a slightly tarnished looked with years of aged beauty and dimension. (Wish I could rub it on me for aged beauty :) ) Since I used oil for this, I let it dry several days before I varnished with an oil satin varnish. The finishing touch on this piece was the upcycled cabinet knob in silver leaf and black diamond Swarovski crystals!

So once again, here's the finished piece.

It's heading over to the Dilworth Blacklion this week. It will be in Booth 409 Eeeklectic Town, www.eeeklectictown.com.  It's already listed on Etsy at www.etsy.com/shop/savardstudios. Shipping on this piece is included. Here's a sneek preview of another clockface table already listed and heading to my booth this week as well. It will be in one of my upcoming blogs!

Monday, May 14, 2012

Black and Gold Crackled Chairs and an Antiqued Green Arm Chair

I love when my beloved clients want to keep an old piece of furniture, be it for sentimental memories or just to upcycle something and save a few trees. Two clients had chairs they wanted to transform. Both were nice, solid wood, but had seen better days.
Jury Chair


The pair of jury chairs where definitely dated but were very solid. I saw a set of 12 of these on Craig's List for $50 each.  http://charlotte.craigslist.org/fuo/2946229121.html.   I think with a cool upholstered cushion on them and some caster wheels, they would make great game table chairs!
Both chairs needed to be lightly sanded and primed. I used a slightly off white latex, stain blocking primer.
The chair with the upholstered seat was to be green with a glaze. I used an interior latex paint in a eggshell finish. I used color 6970, Baltic Green from Porter/PPG Paints.
Since the jury chairs were going to be black and gold crackle I needed to start with a gold base. I used one of my favorite metallic bronze paints. Brushing on metallic paint does leave a brushed metal effect, but since a black crackle was going on top, it doesn't affect the finish.


Once the gold on the jury chair was dry, I applied a crackle size. It goes on milky and dries clear and shiny. It's what makes the topcoat crackle. Once the size was dry, I randomly brushed and stippled the black crackle paint. It's a bit thicker than regular paint, and dries slower to allow for better cracking.
Once the green paint was dry, I was able to glaze it with a chocolate glaze.

After the black crackle dried and the glaze was dry, I was able to add a polyurethane to both chairs. For the crackled jury chair, I used a latex, satin poly. For the antiqued chair, I mixed satin with flat poly to give a more aged appearance. Thought these turned out fabulous!


Tuesday, January 31, 2012

Upcycling Old Furniture - After pictures

So I've been busy this week and weekend completing the items from my previous blog, Upcycling Old Furniture, http://savardstudios.blogspot.com/2012/01/upcycling-old-furniture. I love dramatic finishes so I think these turned out awesome! For the old teacart, I decided to target those with little girls. It's a treasure cart to display their knick knacks, hang their treasured jewelry or their favorite ballet shoes. It's a very unique accent table. I decided on pink, black and silver shimmer for the color theme, with animal prints and Swarovski crystals.The pink paint is another of my favorite products that gives the shimmer of raw silk (once I have an audience of 1000, I will begin to reveal my sources, so tell all your DIY'er friends to tune in). It's a very versatile and durable paint. Not too flashy, but beautiful! It also has a teeny bit of texture, so it really helped float out the flaws in this vintage piece. To the bottom shelf, I added leopard print in a black pearl metallic. The top of the cart is in the same black pearl, but in a fabulous zebra print!
  
On some of the black pearl parts of the legs, I've added clear Swarovski crystals in varying sizes to add a little more sparkle. The ends of the cart seemed a little blank, so I added 3 clear glass knobs on each side. These can be using for hanging small items.
The wheel spokes are silver leafed and topped with a black glaze. What little girl wouldn't be ecstatic to have this in her room!

The burgundy leather french chair was not nearly as old and it was in great shape. But, I couldn't see any reason not to add my bling to it. This was a custom order for an Etsy client, but I do have another chair just like this on that I will be starting on soon. This client loved the leopard, but wanted a french frame design on the back of the seat, with the leopard inside of the frame. She also wanted the wood to be painted black. So, a little sanding on the wood and a few coats of my trusty furniture grade primer and basecoat in one, finished with a satin polyurethane and we were off to a good start. Next, I used a gold wax metallic to stencil the leather. It requires some cure time and some final buffing, but looks fabulous upon completion! Would love your comments on this piece. It's truly unique and one of a kind!
And finally, the upcycling of the old cabinet door. This door was a crackled sample with two different colors on it. I decided to paint right over the old sample finishes in a bronze metallic. I added a black glaze, a smidgen of gold highlights and the words "coats and hats" in english, french, spanish and italian around the outer border. I found 4 vintage iron coat hooks and mounted them in the middle of the door.Viola! A really awesome coat rack to hang in a back entry, mudroom or foyer. Great accent piece for any decor.
Close up of crackled finish


All of these pieces are available in my Etsy store, www.Etsy.com/shop/SavardStudios or at the BLACKLION Dilworth at 1408-C East Blvd., Charlotte, NC.

Related Posts Plugin for WordPress, Blogger...