.jpg) |
| Complete Royal French Chair! Everyone needs one! |
So rather than replace them, she asked me if I could redo them. Since I never say no, I took them home. You would think since so much of the finish was peeling, it would have been super easy to get the balance of the paint off. Wrong. I used a green, environmentally friendly paint stripper. I finally had to enlist the help of my husband's eternal patience and muscle. He finally prepped them down to the metal!
I used a "green" metal primer from one of my favorite online vendors. I used a dark brown because I wanted it to show through the cracks. The picture is one coat, but I did two coats.
I used a crackle size (which is what makes the cracking paste crack) from another fav online vendor. I randomly applied it so that I wouldn't have cracking all over. The shiny, darker areas in the picture have size on them.
After the size dried, I applied my tinted crackle paste. It comes white, so I added a little raw umber to tone it down.
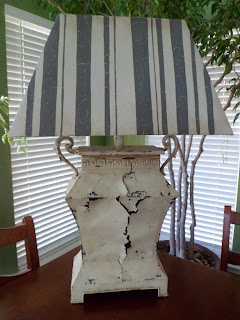
After drying, this is how it looked! Cracked beautifully!
It still needed to be toned down and given some dimension. I mixed a glaze in a dark putty color and appilied it all over the lamp, wiping it off to soften the effect.
Once dry I applied 3 coats of exterior sealer. Lots of layers and labor, but we saved the lamps from the landfill and now they are just as beautiful as before!

.jpg)
.jpg)
.jpg)


.jpg)

You are so talented! I love your posts and and the transformations. Anything old can look new again. That's kind of how I feel!
ReplyDeleteI hear ya sister! Wish a little paint would renew me! Thanks for your encouraging comments!
ReplyDelete