Wednesday, February 27, 2013

Dramatic Dining Room and Foyer Ceiling Makeover

My client of many years wanted to update the painting in her home. When she moved to her new home, for some reason she hired another artist to do some work for her. They did a fabulous job in the powder room, but the dining room was lacking, for a dining room. It would have been super cute for a kids room or a nursery (see cloud mural below). She wanted to paint over it and do something more elegant. There was also a unique trey ceiling in the foyer as well. We had done a metallic wax finish in the coffered ceiling of her family room several years ago. It had a chocolate base with champagne, gold and bronzey red metallic.
All three ceilings needed to work together. We were repainting the walls to have a warmer, copper undertone. So we decided to do a very similar finish in the foyer. Instead of gold we used copper. We also pulled the copper from the foyer into the dining tray ceiling. Treating the trim the trim of both ceilings with copper leafing added more drama and eliminated some white trim with out feeling the need to do all the trim. Here's the before dining and foyer photo.
Dining ceiling before
Foyer ceiling before
 
Both ceilings were taped off and painted a chocolate brown, including the trim. Then we taped off the trim so we could finish the ceilings. 

 
The dining room ceiling was painted a red bronze metallic in a brush metal technique.


When that was dry, we added a copper metallic glaze. This added additional dimension to the ceiling and softened the contemporary feel of the brushed metal technique.


After this dried overnight, we were able to tape off the ceiling so that the trim could be completed. We did the dining ceiling trim and the foyer ceiling trim in the same color and technique. I order all of my leafing supplies from The Gilded Planet. They have everything you could ever need for gilding. For all the foodies out there, they even have edible gold leaf! That's something I must try someday!
Back to our trim. We applied one coat of water based size. It goes on milky, but dries clear. Once dry, it will remain tacky for 24 hours. Size is what makes the sheets of leaf stick to your surface. It dries pretty quick, less than 1 hour. Now the fun part.. we start applying each 6" x6" copper leaf square side by side. I love an old worn look so I don't work about cracks and holidays. It adds to the character. You can get total coverage if you want that look.
It's very Las Vegas shiny at this point. You can burnish it to tone it down but I prefer to glaze it with an umber oil glaze or even stain can work. I talk about metal leafing in a bit more detail in my Silver Leafed Chest of Drawers post. The Gilded Planet also has some excellent tutorials.
After painting the foyer ceiling brown, we applied our 3 metallic wax colors, champagne, copper and burnished red with a brush then blended it together with a flexible trowel. If you are curious about the technique, let me know and I'll do a tutorial.
 

We did the trim the same as the dining ceiling trim. Once everything was dry, we glazed the ceiling and the trim with the same umber glaze.

metallic tray ceiling, dining ceiling, copper leafed trim
Copper metallic tray ceiling
copper leafed trim, metallic foyer ceiling,
Metallic wax tray ceiling


So which ceiling do you like best?


Pin It


Monday, February 25, 2013

10 DIY Paint Tips Your Home Improvement Store Won't Tell You

copper ceiling
Copper faux finished ceiling with painted walls
I have been painting professionally for 18 years. Mostly murals, furniture and decorative, faux finish stuff. But my clients often prefer to have a female painting in their home instead of a big, burly guy who may or may not speak English. With decorative painting you must tape off because you are often using a rag or a trowel to complete the finish. Most finishes require some sort of base to begin the process so I am quite proficient at regular painting. I am sure there are many tips and tricks for painting out there, but these are a few things that I've learned along the way that continue to cut costs and simplify each day.
    DIY Paint tips
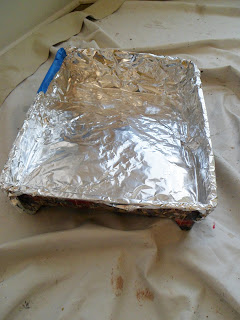
1. Foil for cleanup: I know you can by plastic paint tray liners, but when you paint regularly, it really cuts into the budget. I started buying a separate roll of heavy duty aluminum foil. We pull off a piece to fit into the tray. Saves us from cleaning the tray and it gives a fresh pan to roll in every time.  And if the aliens land, we can always put it on our head so they can't read our thoughts. 
2. Paint additive for quick clean up: I'm sure you've heard of Flotrol. Each paint company labels their own as well. It's typically a latex paint additive. I add about a quarter size into the base of my paint brushes. It keeps the paint wet in the brush and makes clean up a breeze. If you don't do this and some paint hardens in the bristles, I covered how to clean them in my Pinterest projects that I actually completed post.
DIY paint tips

3. Grey tinted primer under reds : If you have ever painted a wall red before, you know it can take 5 or 6 coats to get proper coverage. Grey primer is the solution. It makes the red more opaque so that it typically covers in two coats.
4. Primer on walls not required: Good quality paints cover well. If your walls have been painted before they don't need to be primed to change the color. The exception would be if your walls are a dark color and you are going light or if your walls are disgustingly dirty or moldy. One other bit of info, those new "paint and primer in one" paints out there are not for painting furniture unless it's already been painted. You should still prime raw wood and furniture first for durability.
5. Brush cut in then roll: I always recommend that you cut in the edges with a brush first and ideal roll while that is still wet. Perhaps work on one wall at a time or half  a wall. This is most important with eggshell or satin paints.
6. Quality tools: Cheap brushes and rollers create more work and frustration. If you hate painting, it may be your tools. You get what you pay for. Invest in good quality and clean thoroughly after each use. Cheap brushes have bristles that splay everywhere. Cheap rollers leave fuzz and cause paint spatter.
7. Quality tape: Don't use vanilla colored masking tape on walls or trim. It's too sticky and will either leave residue or will pull off paint and wall board when you remove it. Use the blue tape. There are different brands, some better than others.
8. Quality drop clothes: Use heavy canvas or vinyl backed drop clothes. Painters plastic is for covering furniture not floors. You will slip and break your neck if you try to use plastic. It's too lightweight and it's slippery.
9. Wrap brushes in plastic: While waiting for layers to dry, you can wrap your bush in plastic to keep the paint from hardening and creating crusty bristles.
10. Refrigerate rollers: If your painting project will span over more than one day and you hate to clean rollers, you can wrap them tightly in plastic at the end of the day and refrigerate them. The cold keeps the paint from curing and you can reuse it the next day.

I hope you find this info helpful. If you have any questions or comments, I would love to hear them. Do you have a useful painting tip to add?


Pin It

Wednesday, February 20, 2013

Glittered Washer Necklaces with Crystal Shamrocks


shamrock washer necklace green glitter
Shamrock Washer Necklace
I always post about my big painting projects on walls, ceilings, trim and furniture. But I like to paint many other things as well. I have a hard time reeling it in and often have many projects in process. I find painting washer necklaces soothing and much less labor intensive. I had made some cute ones for Valentine's Day and a friend wore hers to her school and everyone was asking about them.
"Can you make some for St. Patty's Day?" she said. Of course! So I primed some washers of varying sizes and painted them green. Added some gorgeous, green glitter paint and gloss sealer. Always both sides. Added some crystals for the shamrocks and a small piece of jewelry wire for the stem and a black satin cord and they are done! I made them in two sizes and some cute washer earring to coordinate. I made a 2" washer necklace that has 3 small shamrocks. And I made a smaller 1.25" washer necklace that has one small shamrock. The washer earrings have 3 small crystals on each. So if you are feeling festive and wanting some green for St. Patrick's Day to avoid getting pinched, you should head on over to my Etsy store and get yourself one of these. What silly craft do you like to create just for fun?


Fluster Buster

Pin It

Sunday, February 17, 2013

Gorgeous Carolina Blue Skies and Snow!


carolina blue skies, snow

It's not often that we get snow in our Carolina town, but when we do, I always enjoy the beauty of it. Usually, it has to snow for hours to get any accumulation but it started Saturday afternoon and it was a BLIZZARD for us! With in 30 minutes everything was covered. It was awesome! And the best part was that it's been warm enough that it didn't stick to the roads. We are not equipped to handle that here. Northerners love to make fun of our snow driving! 
Then there's the inevitable panic of being out of bread and milk!! What ever will we eat! Oh well, we can walk 2 miles through our neighborhood and be at the grocery store. I think we'll be OK.

Here's a few shots of the blizzard yesterday! A bit dreary, but still beautiful! For those who get hammered with snow all the time, do you still find it beautiful?


This southern gal is officially ready for spring!


Sunday, February 10, 2013

Weekend Madness - A Glimpse into My Weekend, Furniture, Shoes and More

I always wonder why my weekends don't feel like weekends anymore. When you love what you do, you really don't mind it. Work becomes fun and exciting and it all gels together. Except when fatigue and pain pop in. :)
I did get to have some fun at my husbands company awards party. I did get a new outfit, but didn't want to waste money on heels I might wear once per year. I'm a jeans and t-shirt kinda girl. I apologize that I didn't get a photo of us. We looked really awesome but you'll just have to take my word for it. I did however decide to modify some comfy heels I had. They were black Aerosoles with a wedge heel. Higher than I typically would wear, but they don't hurt my feet. I felt they needed a little bling. Broke out my container of Swarovski crystals and found some larger black diamond ones that I had used on someone's walls. (Yes, I put crystals on walls, why wouldn't I? I'll post about it sometime.)
Just added a touch of bling, but what do you think?


I also had a couple of accent chairs and a table I was trying to finish. And I did complete them. Craziness again. The chairs were matching, but I treated them totally separate. One gloss black and gold the other hot pink with pink leopard print fabric. Very dramatic, but that's the way I roll. Hopefully, someone will fall in love and buy them. Do you think these are too over the top?
hot pink and leopard chair
Hot Pink Chair with Pink Leopard Fabric

black and gold chair
Gloss Black Chair with Black and Gold Fabric
I love the pink leopard chair! If I had a teenage daughter, this would be in her room! If I had a music room, the gloss black chair would be sitting near the piano!
I recognize that my backdrops for my photos need some consistency. I have the hardest time getting good photos in good light, etc. I've been trying to determine the best way to create a large enough back drop for my furniture. I went to the Habitat for Humanity Restore this weekend which has tons of salvaged housewares, furniture, etc. I picked up few closet doors and bifold doors that I am transforming to be a consistent backdrop for me. I'll be working on a post for that as well. I am also looking for a cheap crystal chandelier for staging my photos. For my "flooring", we remembered we had some old matchstick blinds in the attic. I'm going to paint and stencil those to create a soft floor for staging my photos. I'll be posting on that as well.
Back to my furniture. I had a small drop leaf bistro table that I've been trying to decide what to do with it for a long time. This is how it turned out. Let me know if you want me to post about how I did this.
bohemian decoupaged bistro table

Decoupaged Bistro Table
I think the decoupaged bistro table turned out pretty cool. I would love some honest feedback!

I almost forgot! My carrier showed up at 11 pm Saturday night to pick up my latest custom order clock face table. Green, Black and Gold! It's on it's way to New Jersey!
black green and gold clock face table
Black, Green and Gold Clock face Table
Sometimes my days seem endless and I always feel like I didn't accomplish enough, but when I write it all down it definitely makes me realize, many things were achieved and I need to slow down a bit. Have an awesome week!


Pin It

Tuesday, February 5, 2013

My Local Storage Wars

Today I decided to go to my first storage unit auction. It wasn't on the agenda of my already full day. But, I got wind of it yesterday and decided I needed to go. I've thought about it for quite some time but the timing never was right. Upon arrival, I almost left the facility because there wasn't parking. Except, there was one hidden parking space left. I pulled in. It looked like a lot of people were there. I was intimidated and started to back out. After all, I had no idea what I was getting myself into. I sucked it up. That parking spot was there.....for me.
I entered and signed in. I knew the facility manger so that was comforting. I've rented office warehouse space there before. I didn't see any of the famous storage wars people there. I can't imagine why they wouldn't be in our little town of 25,000. This auction was a silent auction so it was pretty low key. You have a form to enter the unit number and your bid. The facility manager collects the bids and awards the unit to the highest bidder. There were 9 units up for bid. If you win the unit, you put your own lock on it so make sure you bring your own locks. You have 48 hours to clear out the unit. That alone deterred me from bidding. I wasn't prepared for the frenzy that would ensue if I had to clear out a unit. My house is currently packed out with furniture I'm working on or waiting to ship. And my studio bonus room is ripped apart as we have started the floor project that was one of my New Years goals.
The first few units were basically bags of clothes. One went for $2. You could probably rack up selling those at a yard sale. There were several that looked interesting. The pros there brought their own flashlights to shine in and see better. You're not allowed to touch anything or go inside. One unit had a treadmill, a leather sectional, a sofa and love seat and much more. It went for $252. Another had a dining table and chairs that I could have worked miracles on, but it also had many school desks and boxes of inventory of something unknown. It went for $186. Another unit had a washer and dryer and a big flatscreen tv. But did they work? That one went for $504. Of course all of these units had a ton of "junk" as well. I wasn't prepared to deal with that.
It was an enjoyable hour or so. I feel more knowlegable about the process now and look forward to attending one with a plan. Storage Wars, here I come! Have you attended one of these? I would love to hear about your experience.

Sunday, February 3, 2013

Color Kills or Killer Color?

I don't often think about the evolution of colors and what our founding forefathers did to achieve color in their homes, but this article from Houzz was too good not to read. The combination of elements to achieve colors and how those elements leeched into the atmosphere to kill those sleeping in the beautifully painted rooms. Imagine that! We are all concerned about low VOC paint, but this is a whole different level. I hope you enjoy this article! I do love George Washington's choice of verdigris! What do you think?

Related Posts Plugin for WordPress, Blogger...